


what you need to know
-
You can unlock the front door and the studio double doors with the last 4 digits of you phone number.
-
Godox Strobe Lights
Equipped with sturdy stands, four modifiers, and two umbrellas, these lights are ideal for high-intensity shoots. Feel free to adjust as needed, but please return them to their original setup afterward.
Continuous Light
Adjustable for both intensity and color temperature (cool to warm), this light offers consistent illumination.
RGB Light
Our FL 8080W RGB video light allows you to add ambient color to your shoot. For detailed instructions on its operation, refer to the course link provided.
Modifiers and Spotlight
Enhance your lighting with our collection of modifiers, all compatible with Bowens mounts for easy attachment. For a focused effect, consider using the spotlight modifier.
DETAILED INSTRUCTIONS AND IMAGES OF LIGHTING EQUIPMENT AT BOTTOM OF PAGE
-
Select Your Backdrop:
Pull the chain or cord connected to the rod of the backdrop you want to use.
Lower it to the desired height by gently pulling one side of the chain.
Adjust the Length:
Stop pulling the chain when the backdrop reaches your desired length.
Make sure it unrolls evenly to avoid wrinkles or folds.
Switch Backdrops:
Roll up the current backdrop fully by pulling the opposite side of the chain.
Repeat the first step for the next backdrop.
Tidy Up:
Roll up unused backdrops at least halfway to keep them neat and out of the way.
Smooth Out (if needed):
Check for wrinkles or creases and use a steamer if necessary before shooting.
**If you rip/damage the backdrop your card on file will be charged.
-
We provide GODOX triggers; however, compatibility with all camera models isn't guaranteed. If you have your own triggers, feel free to bring them. Alternatively, our continuous lighting serves as a reliable option.
When you’re connecting the trigger with the strobe, make sure they’re set to the same channel and group. You can check this by looking at the LED screen on the strobe—it should say CH (channel).
If it’s not on the correct channel, just hold down the silver button labeled “CH” until the channel number starts blinking. Then, twist the knob to change the channel and match it with the trigger.
To adjust the channel on the trigger, hold down the CH button under the LED screen until it blinks, then twist the knob to match the strobe’s channel.
A few extra tips:
• Sometimes the trigger isn’t fully pushed into the camera’s hot shoe, so double-check that it’s securely clicked in.
• The trigger can also go to sleep, so if it’s not firing, try pressing the little lightning icon or take a few test shots to wake it up.
-
Post-Shoot Procedures
Before leaving, ensure the studio is reset to its original condition:
Clear all props and return equipment to its designated place.
Reset lighting, modifiers, and backdrops as they were upon your arrival.
A QR code near the exit provides a visual checklist for your reference.
We recommend resetting the studio to its original condition to avoid extra charges.
Overtime fees, door unlocked fee, messy floor, not putting things back, ripped backdrop, damaged or stolen items (all items at cost)
-
Exit Procedures
To check out, turn off all lights and equipment, close the door fully and re-enter your access code to log your exit time. Verify that it auto-locks behind you.
Time Management
Please be aware of your booking duration; overstaying may result in additional fees. We recommend wrapping up a few minutes early to avoid extra charges.
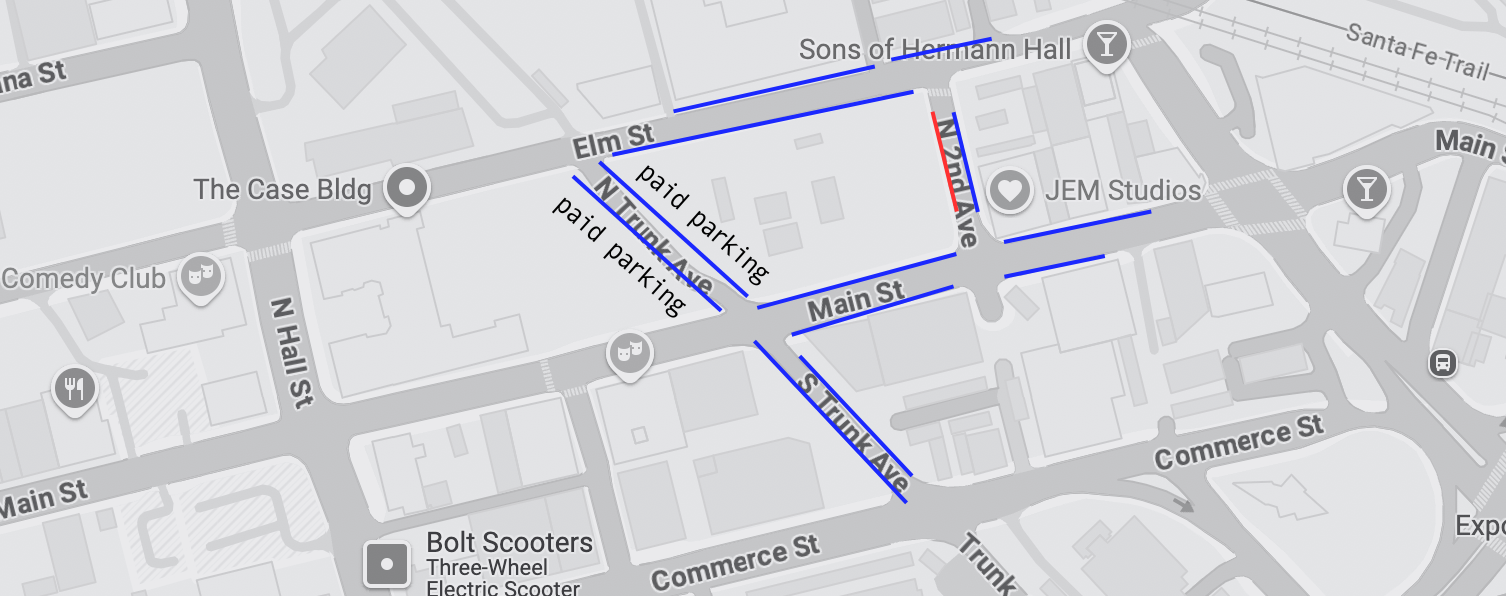
PARKING map
WAY IN DETAIL BREAKDOWN OF OUR LIGHTING OPTIONS
LIGHTING BREAKDOWN

strobe Light
The Godox SK400II is a versatile studio flash unit designed for professional photography. To effectively use this equipment, follow these steps:
-
Mounting: Secure the SK400II onto a compatible light stand using the mounting bracket. Ensure it's stable and properly tightened.
Power Connection: Connect the flash unit to an AC power source using the provided power cord. Turn on the power switch located on the back panel.
-
Reflectors and Modifiers: The SK400II features a Bowens mount, allowing attachment of various light modifiers such as softboxes, umbrellas, or reflectors. Align the accessory with the mount and rotate it until it locks securely.
-
Manual Adjustment: Use the control dial on the back panel to set the desired flash output. The power ranges from 1/16 to full power (1/1), providing flexibility for different lighting scenarios.
-
Modes: The SK400II includes a 150W modeling lamp with three modes: OFF, PROP (proportional to flash power), and percentage-based adjustment.
Setting the Mode:
Press the "MOD/OFF" button to cycle through the modes.
In percentage mode, press the "SET" button, then use the control dial to adjust brightness between 5% and 100%.
-
Sync Cord: Connect a sync cord to the 3.5mm sync jack for wired triggering.
Optical Sync Modes:
S1 Mode: The flash fires in sync with the first flash from another unit.
S2 Mode: The flash ignores the first pre-flash and fires in sync with the second flash, useful when using cameras with pre-flash functions.
Press the "S1/S2" button to toggle between these modes.
-
Additional Features:
Buzz Function: Enable or disable the audible beep that indicates the flash is ready by pressing the "BUZZ" button.
Overheat Protection: The unit includes an overheat protection system. If the temperature exceeds safe levels, the flash will automatically power off to prevent damage.
7. Maintenance and Safety:
Cooling: After extensive use, allow the unit to cool down to prevent overheating.
Handling: Avoid touching the flash tube or modeling lamp with bare hands to prevent oil residue, which can affect performance.

RGB CONTINUOUS LIGHT
The Ambitful FL80 RGB is a versatile LED video light designed for photography and videography, offering a wide range of color temperatures and effects. To effectively utilize this light, follow these steps:
-
Mounting: Attach the FL80 RGB to a compatible light stand using its Bowens mount. Ensure it's securely fastened to prevent any movement during use.
Powering the Light:
AC Power: Connect the included power adapter to the light and plug it into a standard electrical outlet.
Battery Power: For portable use, insert two NP-F970 batteries into the designated slots. Ensure the batteries are fully charged before use.
-
Turning On/Off: Use the power switch located on the back panel to turn the light on or off.
Adjusting Brightness:
Rotate the control dial to increase or decrease the light intensity.
The LCD display will show the current brightness level as a percentage.
-
Color Temperature Adjustment:
Press the "Mode" button to enter CCT (Correlated Color Temperature) mode.
Use the control dial to adjust the color temperature between 2800K (warm) and 10000K (cool).
RGB Mode:
Press the "Mode" button to switch to HSI (Hue, Saturation, Intensity) mode.
Adjust the hue (0-360°), saturation (0-100%), and intensity (0-100%) using the control dial to achieve the desired color.
-
The FL80 RGB offers 10 built-in special effects, such as lightning, police car, and candlelight.
To access these effects:
Press the "Mode" button until you reach the effects mode.
Use the control dial to select and adjust the desired effect.

standard Continuous light
Set Up: Mount the light on a stand. Use either the AC adapter or two NP-F batteries for power.
Power On: Press the power button on the back.
Adjust Brightness & Temperature:
Rotate the "INT" knob to control brightness (0%-100%).
Use the "CCT knob" to adjust color temperature (3200K-6500K).
Effects: Press the "Effects" button to access built-in modes like Strobe or Fireworks.
Wireless Control: Connect via the Sidus Link app for remote adjustments.
Accessories: Attach the softbox or grid to diffuse or direct light.